


Nail care tips


Complete OPI GelColor Prep Step by Steps. Apply one coat of GelColor Stay Strong or Stay Classic Base Coat and cure for 30 seconds in the OPI LED Light.
Apply a swoosh of Infinite Shine Pop the Baubles where the two colors meet. Allow to dry.
Apply one coat of Infinite Shine Go Big or Go Chrome to one side of the nail. Allow to dry.
Apply a coat of Infinite Shine Gloss to the accent nail. Immediately place a crystal in the center of the nail. Use a detail brush-dipped Infinite Shine Gloss to pick up and place gold bullion in a bow shape around the crystal.
Apply Infinite Shine Sleigh Bells Bling to the other side of the nail. Immediately apply>Infinite Shine Go Big or Go Chrome to the opposite side of the nail, using the brush from the bottle to blend the colors together. Allow to dry.
Apply a coat ofInfinite Shine Gloss. Allow to dry. Apply ProSpa Nail & Cuticle Oil to each nail and massage in.
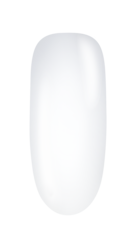
Apply one coat of Powder Perfection Base Coat to one nail leaving the perimeter free. Immediately dip the nail into Powder Perfection Alpine Snow. Lightly brush away excess with a cosmetic brush. Repeat for coverage, covering the entire nail with the second coat.
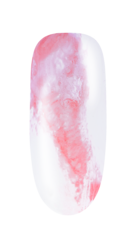
Apply one coat of Powder Perfection Base Coat in a diagonal wavy line down the center of the nail. Immediately pick up Powder Perfection Racing for Pinks with an oval brush and sprinkle over the base coat creating a marble effect.
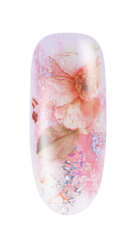
Apply a layer of Powder Perfection Base Coat to the entire nail, apply Powder Perfection Activator and wait 5-6 seconds (10 seconds for International). Cut a piece of rose transfer foil the size of the nail and press firmly into the base coat. Smooth the foil flat to the nail and allow the base coat to set before removing the transfer foil backing and leaving the design on the nail.
Apply Powder Perfection Base Coat and immediately dip in Powder Perfection Clear Color Set Powder. Dust off excess powder. Apply one generous coat of Powder Perfection Activator and wait 1-2 minutes (4 minutes for International).
Refine the shape as needed working from an EDGE 180 File. Buff the nail starting with the FLEX 100/180 Buffer, then the FLEX 220/280 Buffer. Remove dust and apply a second generous coat of Powder Perfection Activator to the nail and allow to dry for 1-2 minutes (4 minutes for International).
Apply two coats of Powder Perfection Top Coat and allow to dry 1-2 minutes between each coat. Apply ProSpa Nail & Cuticle Oil and massage in.